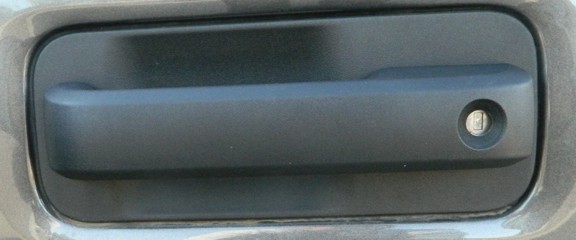
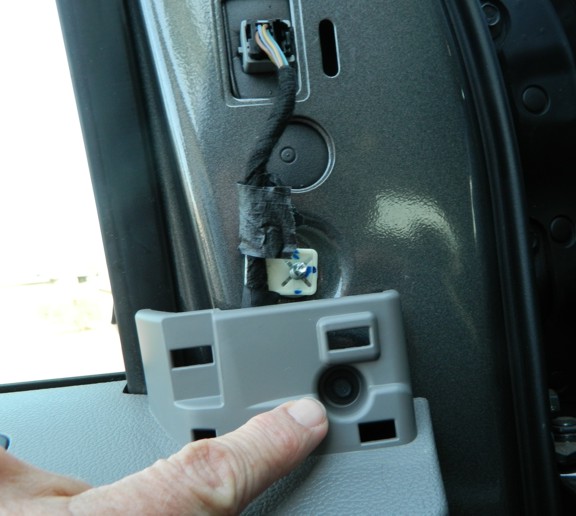
Photo 1
The first photo shows a drivers side door handle. This same handle is used on the following vehicles:
2015 and newer F150
2017 and newer Raptor
2017 and newer F250, F350, F450 Super Duty
If your handle resembles this shape, this is the correct tutorial.
Work carefully and take notes or make sketches to help you put the door back together properly.
 1
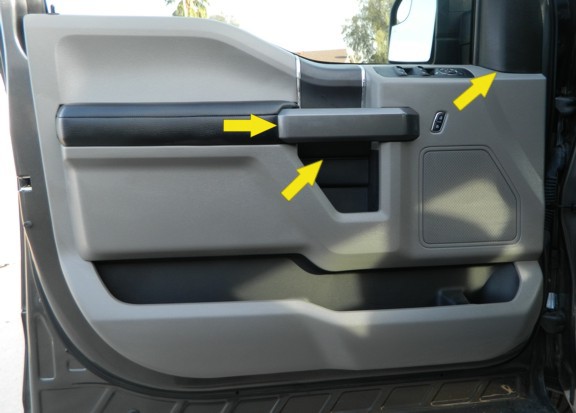
1 Photo 2
Door panel to be removed. The following pieces must be removed to get at screws.
The upper right corner plastic cover
The inside pull handle cover (silver in this picture)
The small cover below the pull handle, near center of door. Can't see it in this photo, but the center arrow points to the area..
 2
2
Door panel removal process
Note: To help prevent scratching, wrap your tools that may contact painted surfaces in masking tape before beginning.
Roll your window down now. It will be easier to pull the door panel off with the window down.
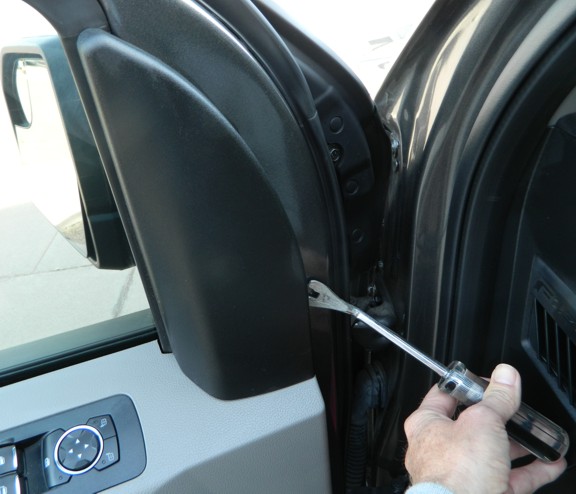
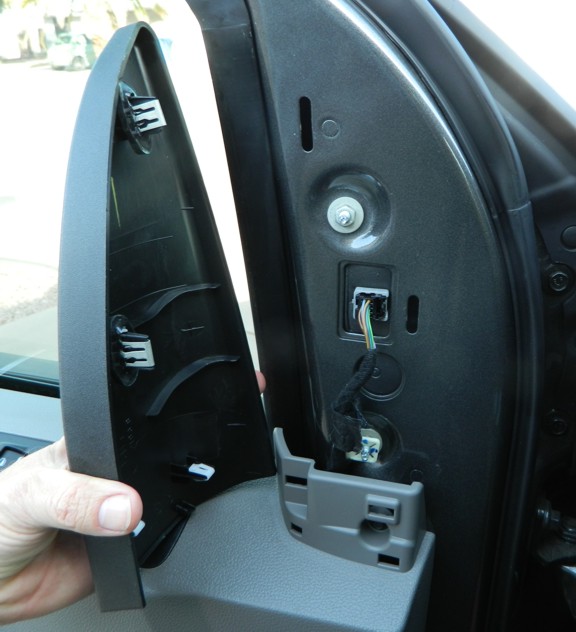
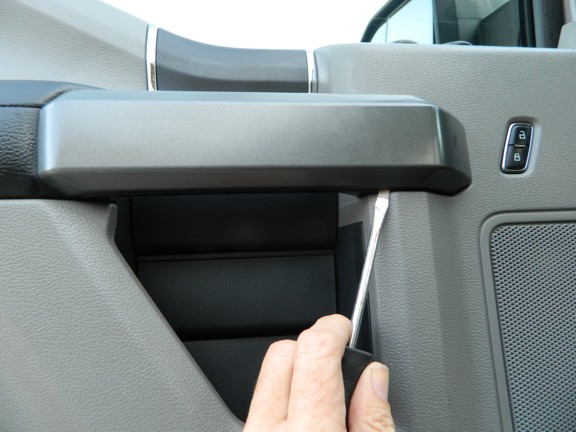
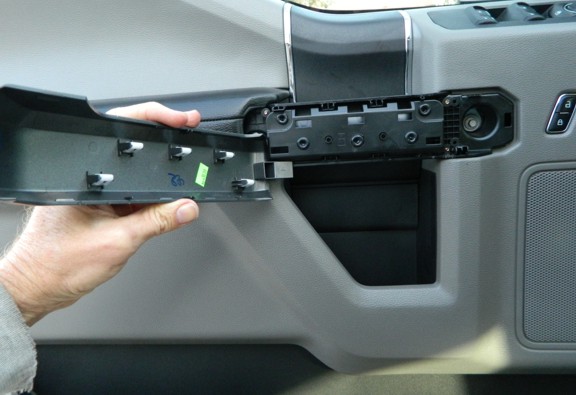
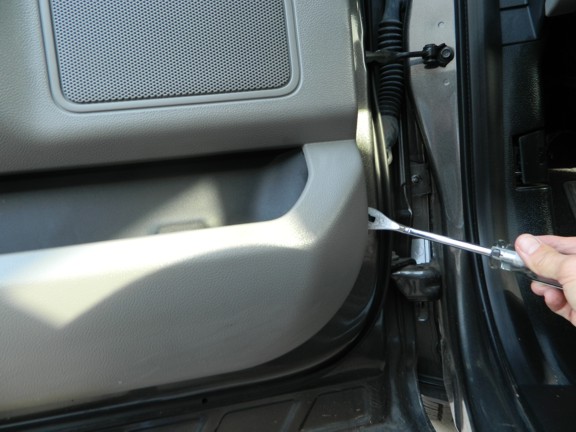
Photos 3 and 3a
Remove the upper inside corner trim piece. Start by prying on the inside edge as shown in photo 3. The cover will pull away from the door metal by prying straight outward.
Photo 3a shows the snap clip locations on the backside of the corner cover.
 3
3
 3a
3a
Photo 4
One door panel screw is found under the corner cover.
Remove this screw now. Be sure to put all hardware in a pan to keep from losing it.
 4
4
Photos 5 and 5a
Carefully pry the cover off the door panel pull handle. Start at the front of the cover, the end nearest the truck body with the door open.
Several snap clips hold the cover on. Work your way around carefully, pulling the clips straight out. Photo 5a shows the locations of the clips.
There is a tab at the back end of the cover to hold it in, so work from front to back to pry it off.
 5
5
 5a
5a
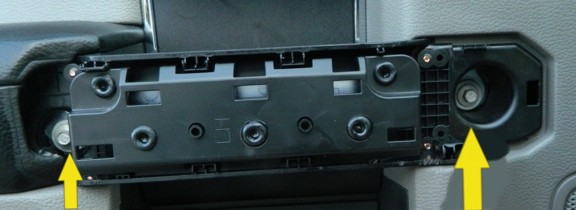
Photo 6
Two door panel holding screws are hidden behind the cover. Photo 6 shows the locations.
Remove these screws now.
 6
6
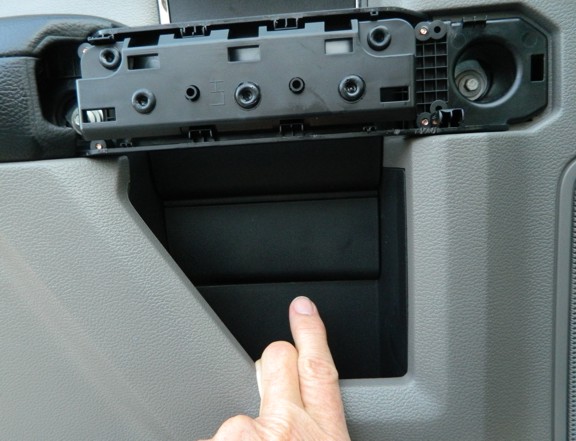
Photo 7
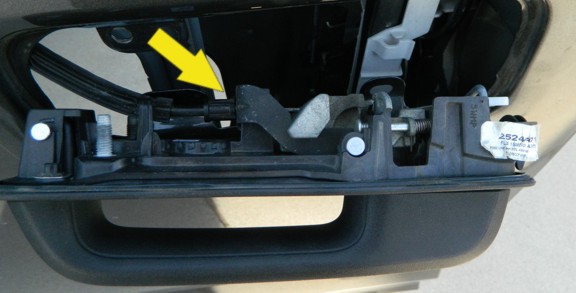
There is a small cover under the pull handle. My finger is pointing at the bottom edge of this cover in Photo 7.
To remove this cover, pry along the top or front edge only. There are mounting tabs along the bottom edge that you don't want to break.
Tow snap clips along the top hold the top of the cover in place. Once they pop loose, the cover can be lifted off.
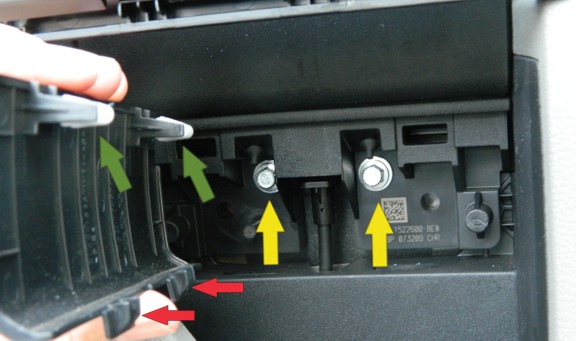
Photo 7a shows the locations of the snap clips along the top of the cover, (Green arrows.) The two red arrows along the bottom edge show the mounting tab locations. These mount in slots on the door panel, so don't pry along the bottom edge.
Photo 7a also shows the locations of two door panel screws. Remove these two screws now. Yellow arrows show the locations.
 7
7
 7a
7a
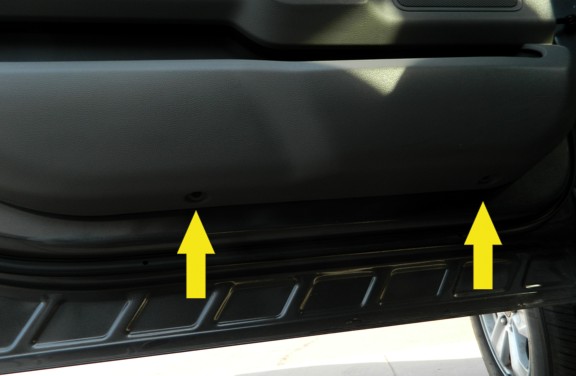
Photo 8
The arrows show the approximate locations of 2 screws along the bottom edge of the door panel.
Remove these screws now.
 8
8 Photos 9 and 9a
The door panel is also held on by several snap clips. A panel tool helps ease the process, they are available at most auto supply stores. If that is inconvenient, you can usually get them loose with a large flat screwdriver and a small block of wood against the door metal.
Start at the edge nearest the body of the truck. Work around the edge of the panel, prying the snap clips straight back away from the door metal.
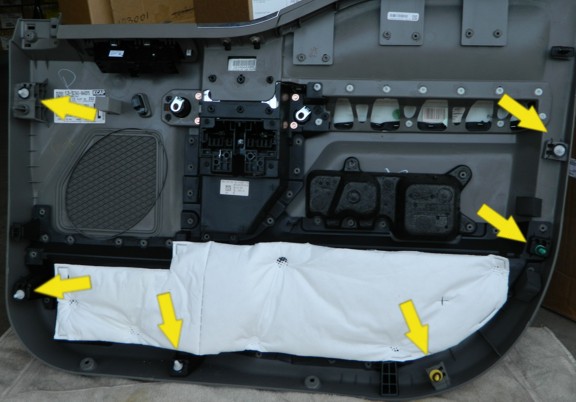
Photo 9a shows the back side of the panel with the snap locations highlighted.
If you pull straight out, the clips will release without breaking. If you do break one, they are usually available at most auto supply stores and even some hardware stores. Just pull straight out and they won't break.
 9
9
 9a
9a
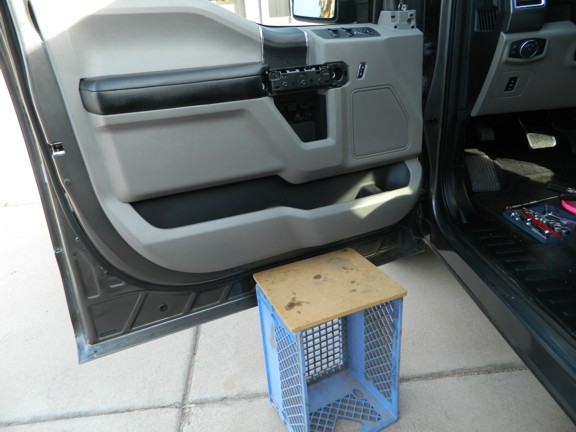
Photo 10 and 10a
Photo 10. Place a box or stool under the edge of the panel after all the clips are loose, but before trying to lift the panel off the door. There are some wire connectors on the backside that will need to be released before the panel can be set aside.
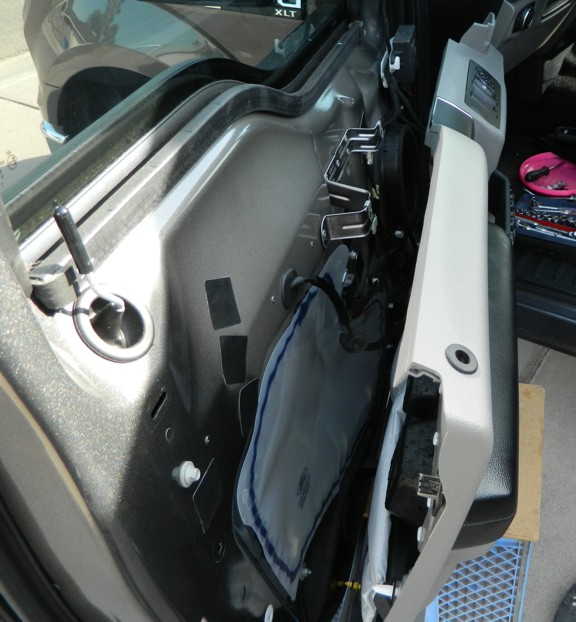
With all snaps released, the panel will be loose on the door. Lift upward to clear the manual lock rod on the door. Top edge of panel needs to come up and away from the window channel.
Once loose, set the panel on the box. Photo 10a.
Next, locate the various wires on the backside of the panel that will need to be disconnected. They include:
Electric door lock switch cable
Window control connector
Inside handle pull cable
Each of these are easy to disconnect once the release tab on each connector is pushed. Do not pull on the wires! Instead, grip only the connector body. Once the release tabs are pushed, the connectors release very easily! Don't force anything!
The next photos show these connectors and release tabs.
 10
10
 10a
10a
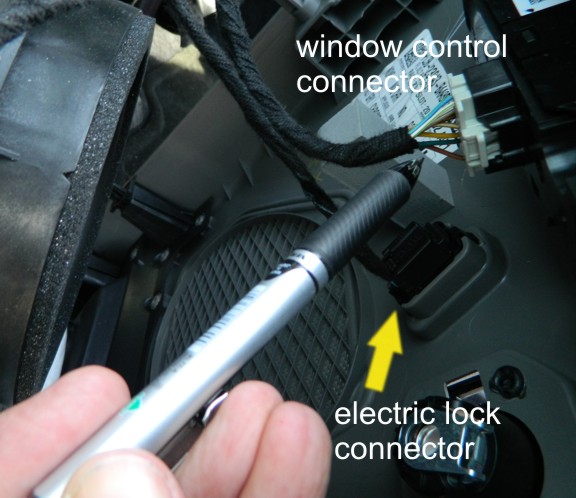
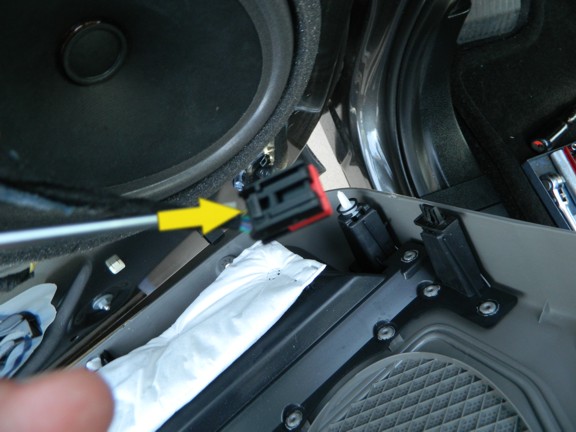
Photo 11
Disconnect the electric lock wires. (Black connector.)
There is a tab on the bottom end of the connector you can push with your finger. This releases the connector and it will slide out of the housing easily. Photo 11a shows the tab location.
Push the tab inward as you gently pull the connector downward.
Before disconnecting the window wires, roll the window up!
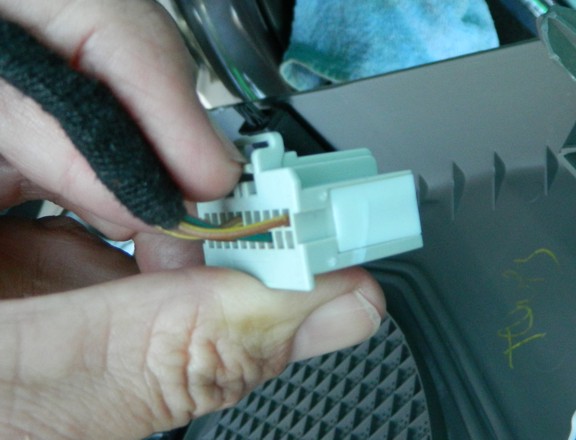
Next, release the window wire connector. (White).
There is a release tab on the side of the connector. Push the tab and gently pull the connector out of the housing. It should come out very easily, so don't force anything, and pull only on the connector, not the wires.
Photo 11b shows the connector close up with tab location.
 11
11
 11a
11a
 11b
11b
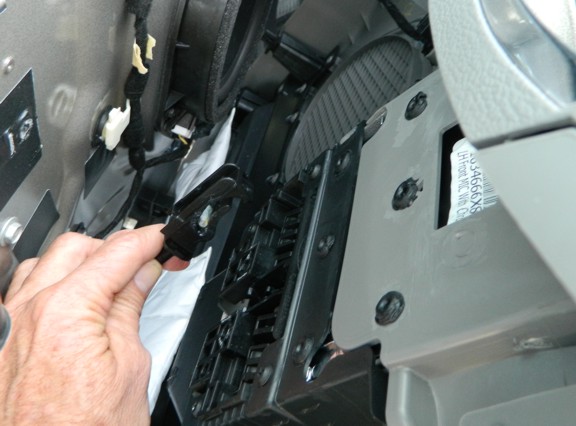
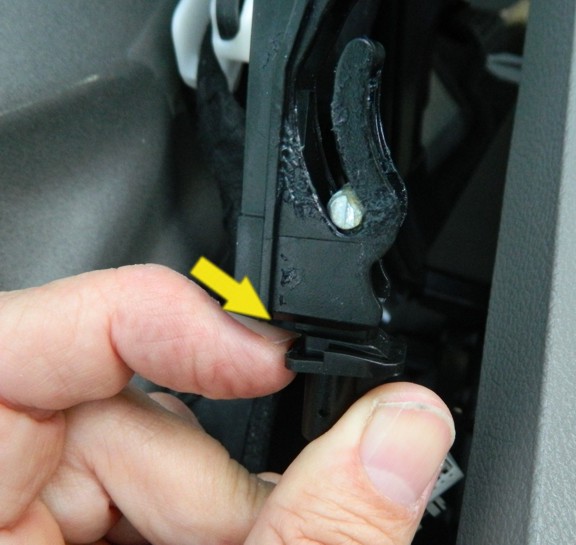
Photo 12
Locate the inside handle pull cable. This cable snaps in place on the door panel and has a locking tab on the bottom edge.
The tab is on the bottom end of the plastic housing, where the cable comes in.
Push the tab downward while gently pulling the bottom end of the cable assembly away from the panel. If the tab is released properly, the bottom end swings out away from the panel and you can easily lift the cable assembly off the panel.
Photo 12a shows the tab location.
With the cable and switch wires disconnected, you should be ready to set the door panel aside.
 12
12
 12a
12a
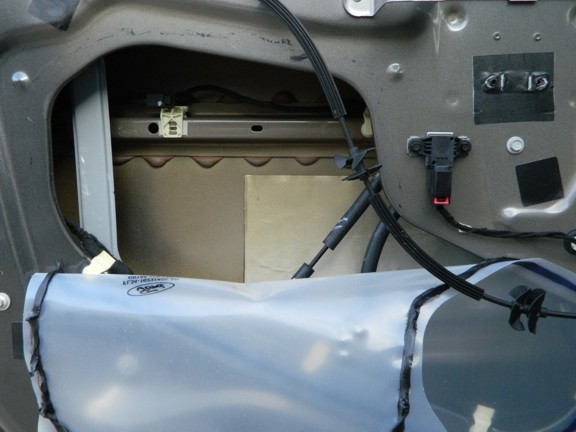
Photo 13
With the door panel now removed, peel back the splash guard plastic on the door metal opening nearest the door handle.
There are usually some small pieces of tape above this opening also. It may be helpful to remove these tape covers to allow more light into the door cavity.
 13
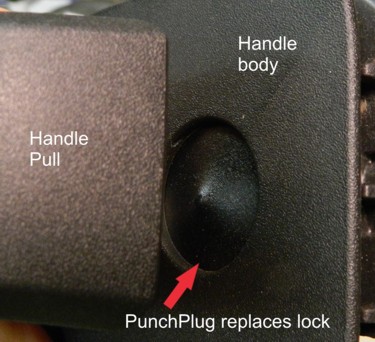
13 Your Jimmi' Jammer® kit is supplied with our PunchPlug™ and LockCap™ to allow removal of the door lock on the drivers door.
This is recommended due to the ease with which a thief can attack the lock body and gain entry to the truck. Installation of the PunchPlug is next.
If you are leaving the lock in the handle, (bad idea), then use this section for directions on getting the lock rod disconnected, then skip the PunchPlug install portion.
Door handle removal.
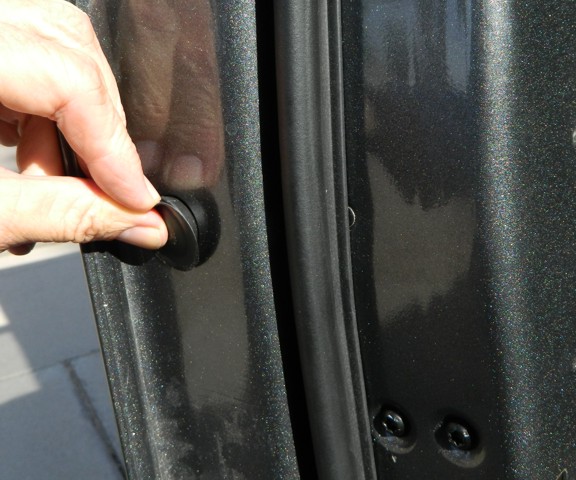
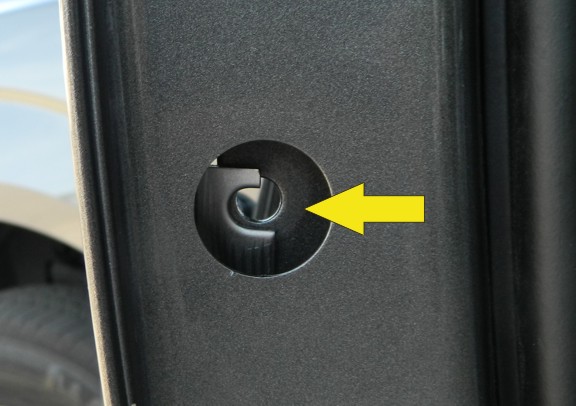
Photo 14
Remove the plastic plug on the door jamb to gain access to one handle mounting bolt.
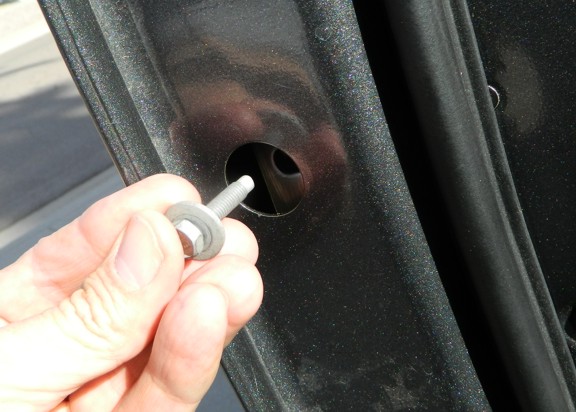
Photo 14a
Remove the handle bolt.
Move to inside the door cavity. There are two nuts on the other end of the handle, one upper and one lower. Remove the two nuts and the handle will be loose. (No photo.)
 14
14
 14a
14a
TIP:
If you have some type of padding that you can tape to the outside of the door with masking tape, put it on below the handle area to prevent any paint scratches. Foam packing material or bubble wrap works well for this protection.
With the handle hardware removed, dislodge the handle by pushing it gently toward the front end of the truck.
Then, pull the handle out of the door metal. The lock rod will still be connected to the lock pawl.
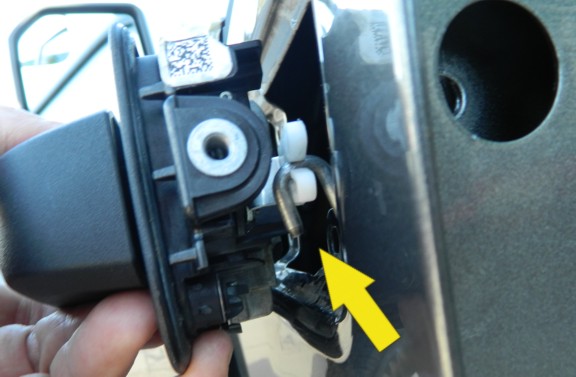
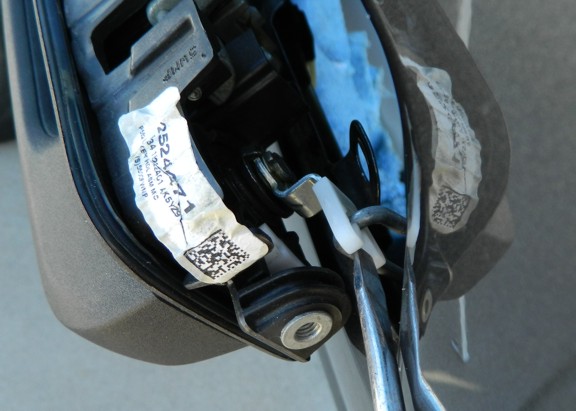
Photo 15 shows the lock rod connected to the lock pawl. Before disconnecting the rod, note the orientation of the lock rod. If you are leaving the lock in place, this rod will need to be reconnected in the same orientation. On this one, you can see the short end of the rod is nearest the handle.
Photo 15a shows how to pull the rod out of the pawl without breaking the pawl clip.
Use a screwdriver to push the tips of the pawl open and pull the rod toward the screwdriver at the same time.
 15
15
 15a
15a
If you are not installing the PunchPlug™ and leaving the lock in the handle, now you can skip to here to install the Jimmi Jammer® plate. (Or scroll down to Photo 23)
If you are installing the PunchPlug™, or wish to replace the lock due to damage, continue by removing the handle from the truck as follows.
Disconnect the handle pull cable from the back of the handle. Photo 16 shows the cable mount. The strain relief can be disconnected at the handle then the cable can be removed from the handle pull.
Also disconnect any wires that may still be on the handle.If there are any, look inside the door cavity for the connection point and release the connector there.
The handle should now be free from the door.
 16
16 Remove the lock rod from the door if you are removing the lock cylinder installing the PunchPlug in the handle.
Shown outside the door for clarity.
To remove the rod from the door, feel the rod for the bottom end, shown in Photo 16a.>>
Tip the rod 90 degrees so that the hook at the bottom can lift up off the tab it is attached to on the latch. See Photo 16b. >>
If the lock rod is not removed from the door, it will continue to move up or down each time you lock or unlock the door. It most likely will fall off at some point and you will have a rattle in the door!
 Photo 16a
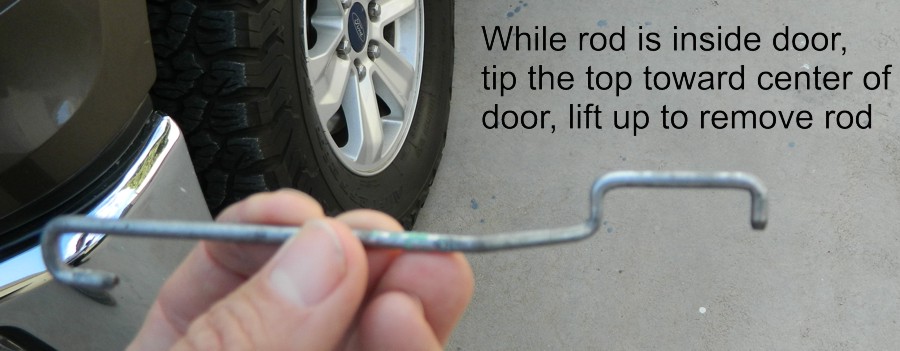 Photo 16b
Do you need a new handle?
If the outside of the handle is damaged to a point you can't live with, or if the backside has more than just broken lock holding clips as shown at the top of Photo 17, then you may need a new handle.
However, if the handle seems to work, doesn't have any outside visible damage, and only the lock holding clip(s) are broken, then you can probably still use this handle. The PunchPlug™ doesn't need the lock holding clips to hold it in place.
Before continuing, protect your door handle painted side with masking tape to prevent scratching!
To install the PunchPlug™, it is easiest to work on a bench and find a way to hold the handle steady. A vice will work fine, but be careful and use padding on the jaws to prevent scratches!
If you have already been burglarized, the lock cylinder may already be loose in the handle. If so, go ahead and remove it from the lock holder.
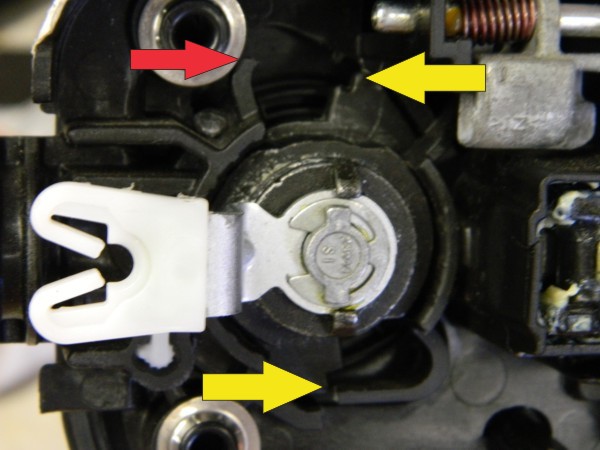
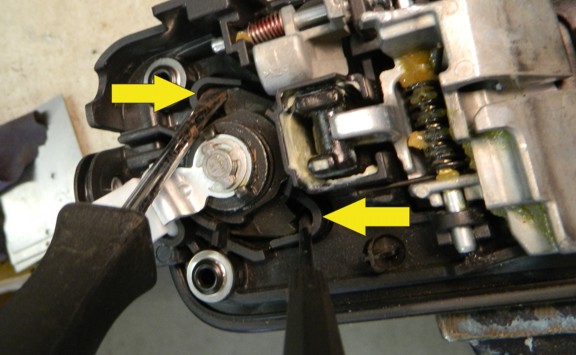
Photo 17 shows a lock holder that is broken from a break-in. When the thief twists the lock with a channel lock pliers or other tool, the plastic clip(s) that hold the lock in place snap and the lock can spin in the holder, unlocking the door.
The two arrows at the top of Photo 17 show the location of the broken clip on this handle. That clip should be the mirror image of the clip on the bottom that the other arrow is pointing to.
If your truck has not been attacked, then the lock holder is probably not broken, so you will need to release the two plastic holders that hold the lock in place.
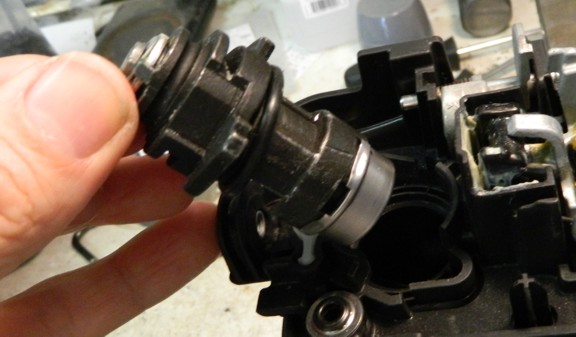
You can use two screwdrivers as shown in Photo 17a. The arrows point to the lock holding clips that are part of the handle. Wedge the screwdriver tips in so the clips separate enough to allow the lock to twist in the holder.
Once you get the lock to twist, it will come out easily. Photo 17b.
 17
17
 17a
17a
 17b
17b
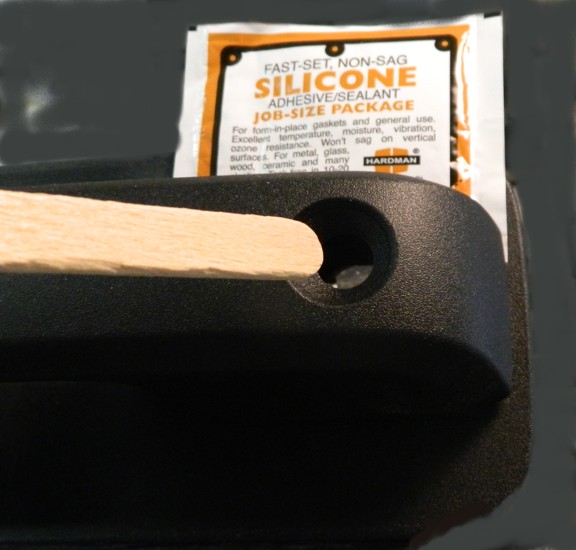
Use the provided Silicone to seal the edges where the PunchPlug™ will mate to the handle. Photo 18.
This is just to keep dirt and moisture out. Use just enough to coat the edge of the lock hole that the plug will cover.
Save the rest of the silicone to put the Lock Cap™ on the pull handle once everything else is done.
 18
18 Two black discs come in your Jimmi' Jammer® kit.
The smaller disc is the LockCap™. This disc will go on the outside of the handle to hide the small hole where you put your key in to get at the lock. Put this on last, after the handle is back in the door and all other installation steps are complete. Set this aside for now, but don't lose it.
The larger of two discs is the PunchPlug™. It will be bagged with a screw and a flat, mushroom shaped piece of metal with a small hole in the center.
Standard color for the plug is black textured. This color can be changed if so desired by lightly sanding the painted side, then painting over it with the desired color. Most dealerships carry touch up paint that can be used. Also, some colors can be matched pretty close with regular spray paint.
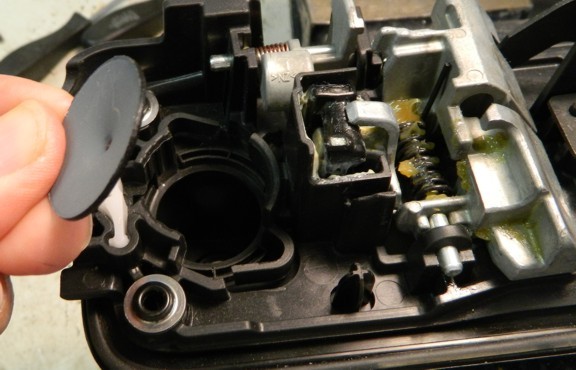
Remove the larger disc from the packet and lay it in the hole, painted side down.
 19
19 Remove the mushroom shaped piece of flat metal and the screw from the packet.
Start the screw into the mushroom hole. It works best to thread the screw in about half the length of the screw while on the bench as it is a tight fit. Then, back the screw out so just a couple threads are coming through the metal.
Put the mushroom into the lock holder area as shown in Photo 20.
 20
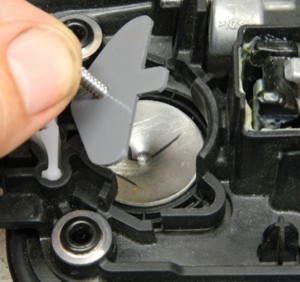
20 Next, twist the mushroom clockwise so the widest part seats in the recesses on the lock holder.
The stem of the mushroom keeps the part from moving as you snug up the screw. Do that now, but not too tight. Just get it snug, then stop.
Use your fingers to check that the assembly is in the lock holder securely. DO NOT OVERTIGHTEN THE SCREW!
 21
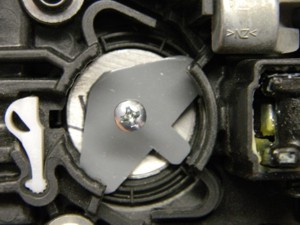
21 Photo 22 shows the front side of the handle with the plug in place.
If you have put the PunchPlug™ in the handle, then you should also disconnect and remove the rod that was on the lock cylinder before continuing. You don't want the rod loose inside the door as it could cause some damage if left unanchored.
(We didn't get a good picture of the rod removal process, so if someone wants to send us one or two, we will put them in this tutorial to help others. )
 22
22 If you chose not to remove the lock from the handle, then continue with this installation tutorial here. If you did install the PunchPlug™, continue on from here also.
Installing the Jimmi' Jammer® plate
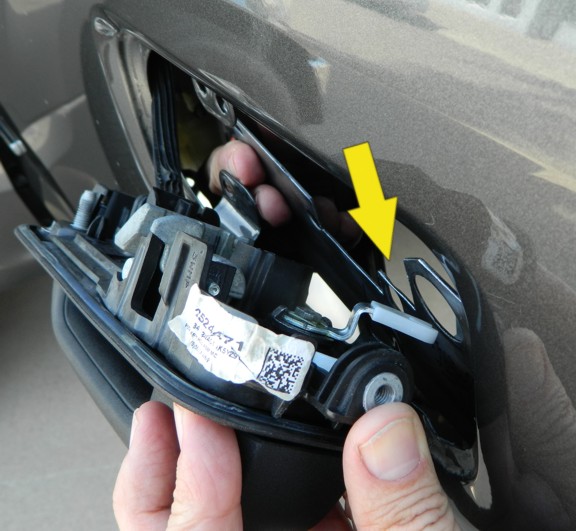
Photo 23 shows how the plate mounts to the handle. This photo has the lock in the handle, if you are using the PunchPlug™, that will replace the lock. This photo is just for reference, you will need to put the handle back in the door before putting the plate on.
If the handle was removed completely, reconnect the handle pull cable and any wires that were disconnected to remove the handle.
If you did not completely remove the handle from the door, you are ready for the next step.
 23
23 If you kept the lock in the handle, use the door key to turn the lock so the lock pawl is pointed downward. This will ease the plate placement. Photo 24.
With the handle just outside the door metal, bring the Jimmi Jammer® plate into the cavity with the large hole nearest the door jamb. The large hole in the plate goes around the lock pawl. Photo 24a.
Now is a good time to re-attach the lock rod that was connected to the lock pawl. It is much easier than when the handle is fastened to the door. Remember to put the lock rod back in the pawl the same way it was connected when you removed it. See Photo 15 above. If the lock rod is put on the other way, it may bind and cause difficulty locking and unlocking the door.
If you installed the PunchPlug™, you won't need to mess with the lock pawl. Just make sure you remove the rod that was connected to the lock pawl before going on.
With the plate started on the handle, put the handle back in place in the door. Get the handle studs in place, and have the plate on the back of the handle.
 24
24
 24a
24a
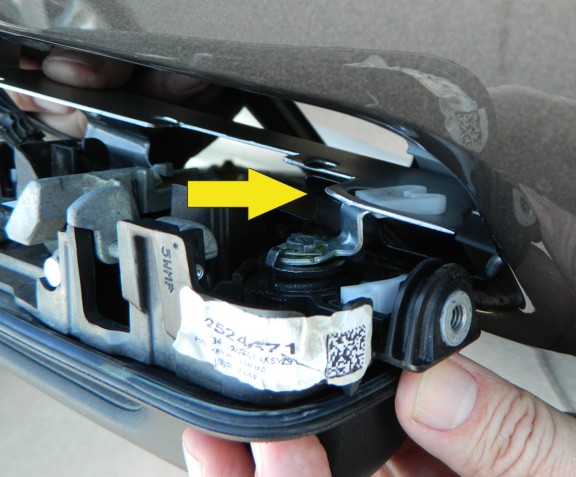
Photo 25 shows the door jamb, where the handle mounting bolt was removed earlier.
The arrow points to the Jimmi' Jammer® mounting tab on the end of the plate nearest the lock cutout. This mounting tab aligns with the hole for handle mounting. (Your plate will look a bit different with the mounting hole complete rather than open like this early prototype.)
You can now put the bolt in. Check that the other end of the plate is on the lower handle mounting stud. Put the nut on that stud to hold the plate in place, but don't tighten yet.
Next, tighten the door jamb bolt that holds the lock end of the handle. Then, bo back and tighten the nut over the plate.
Put the nut on the upper mounting stud.
The Jimmi' Jammer® is now installed. Check all connectors, cables, wires and anything else that was disconnected during installation.
If you kept the lock in place, test operation using the key with the door open.
Tip: It is always a good idea when working on the doors to make sure the other doors are unlocked or even open in case something is missed and you need to get in again.
When everything is checked, close and open the door a few times to confirm correct operation.
When operation is confirmed, put the door back together in reverse order. You can use this tutorial by starting at Photo 14 and working backwards.
 25
25
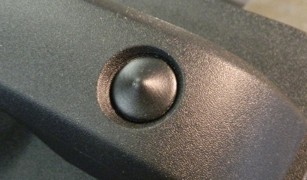
Use a small amount of the silicone on the inside of the key hole recess. Photo 26.
Place the LockCap™ in the center of the recess for the key hole. Don't worry about excess silicone right now. Let it dry overnight and then peel any excess off the handle.
See Photo 26a to see how the LockCap™ will look when mounted. If you have a handle painted to match the truck, the color of the cap can be changed using some touch up spray paint from the dealer or you can get pretty close with hardware store paint in most cases.
Lastly, put your window warning labels in the window. They go on the inside surface and are very sticky, so be sure before touching them to the glass.
All done? Check out our Gate Keeper® for these trucks. Prevents loss of that expensive tailgate!
 26
26
 26a
26a
NOTE: If your truck does not have a lock on the passenger door, or rear doors, you still need a plate on these doors.
Without showing how it's done, it is possible to get at other rods inside the door even if no lock is in the handle. Be sure to install a Jimmi' Jammer on each door that has an outside handle!

Get stuck? Our tech support may be able to help.
Phone 480-452-6894
You may also wish to watch a short video that will show the process.